Creating more re-usable bicep code using user-defined types
User-defined types is a new feature that allows you to define custom complex data structures in your Bicep code. It allows you to encapsulate related properties into a single reusable entity, making your Bicep code more modular and maintainable.
Instead of:
param location string = resourceGroup().location
param storageAccountName string

@allowed([
  'Standard_LRS'
  'Standard_GRS'
])
param storageAccountSKU string = 'Standard_LRS'

resource storageAccount 'Microsoft.Storage/storageAccounts@2022-09-01' = {
  name: storageAccountName
  location: location
  sku: {
    name: storageAccountSKU
  }
  kind: 'StorageV2'
}
You can do:
param location string = resourceGroup().location

type storageAccountSkuType = 'Standard_LRS' | 'Standard_GRS'

type storageAccountConfigType = {
  name: string
  sku: storageAccountSkuType
}

param storageAccountConfig storageAccountConfigType

resource storageAccount 'Microsoft.Storage/storageAccounts@2022-09-01' = {
  name: storageAccountConfig.name
  location: location
  sku: {
    name: storageAccountConfig.sku
  }
  kind: 'StorageV2'
}
There are several benefits to using user-defined types in Bicep:
-
Reusability: user-defined types can be defined once and reused across multiple Bicep files or within the same file. This promotes code modularity and reduces duplication.
-
Abstraction: user-defined types provide a level of abstraction by allowing you to define custom data structures that align with your specific needs. This abstraction helps in simplifying complex deployments and makes your code easier to understand.
-
Type safety: Bicep is a statically typed language, and user-defined types allow you to enforce type safety. By defining the structure and data types within a user-defined types, you ensure that only valid data conforming to the defined structure can be assigned to variables or used as parameters.
-
Readability: Using user-defined types can improve the readability of your Bicep code. By giving meaningful names to user-defined types and their properties, you can make your code more self-explanatory and easier to comprehend.
Let’s explore how to use this new feature to write our Bicep code.
Creating a Storage account module using user-defined types
We need to create a simple Bicep module to deploy a storage account and n number of containers. We need to write the module to be reusable and easy to consume by others.
- Let’s first create a type for the storage account SKUs. It should contain a string with either “Standard_LRS” or “Standard_GRS” for this demo.
type storageAccountSkuType = 'Standard_LRS' | 'Standard_GRS'
- Next, we create a type for the blob containers.
type containerConfigType = {
  name: string
  properties: {
    publicAccess: 'None' | 'Blob' | 'Container'
  }
}
NOTE: In the code above, you can see that we defined types in two different ways, separately and inline
- Finally, we define a type for the storage account and reference the first two types we created.
type storageAccountConfigType = {
  name: string
  sku: storageAccountSkuType
  location: string
  kind: string
  @description('List of containers to create in the storage account')
  containers: containerConfigType[]?
}
NOTE: Notice the ‘?’ at the end of the containers array, this means that this is optional so you don’t have to fill this array if you don’t want to create containers
- To make the storage account type usable by anyone who consumes this module, we need to define a new parameter of type storageAccountConfigType.
param location string = resourceGroup().location
param storageAccountConfig storageAccountConfigType
- Now, we can define the code for our resources and start using those created types.
resource storageAccount 'Microsoft.Storage/storageAccounts@2022-09-01' = {
  name: storageAccountConfig.name
  location: location
  sku: {
    name: storageAccountConfig.sku
  }
  kind: 'StorageV2'
}

resource blobService 'Microsoft.Storage/storageAccounts/blobServices@2023-01-01' = {
  name: 'default'
  parent: storageAccount
}

resource container 'Microsoft.Storage/storageAccounts/blobServices/containers@2023-01-01' = [for container in storageAccountConfig.containers: if(!empty(storageAccountConfig.containers)) {
  name: container.name
  parent: blobService
  properties: container.properties
}]
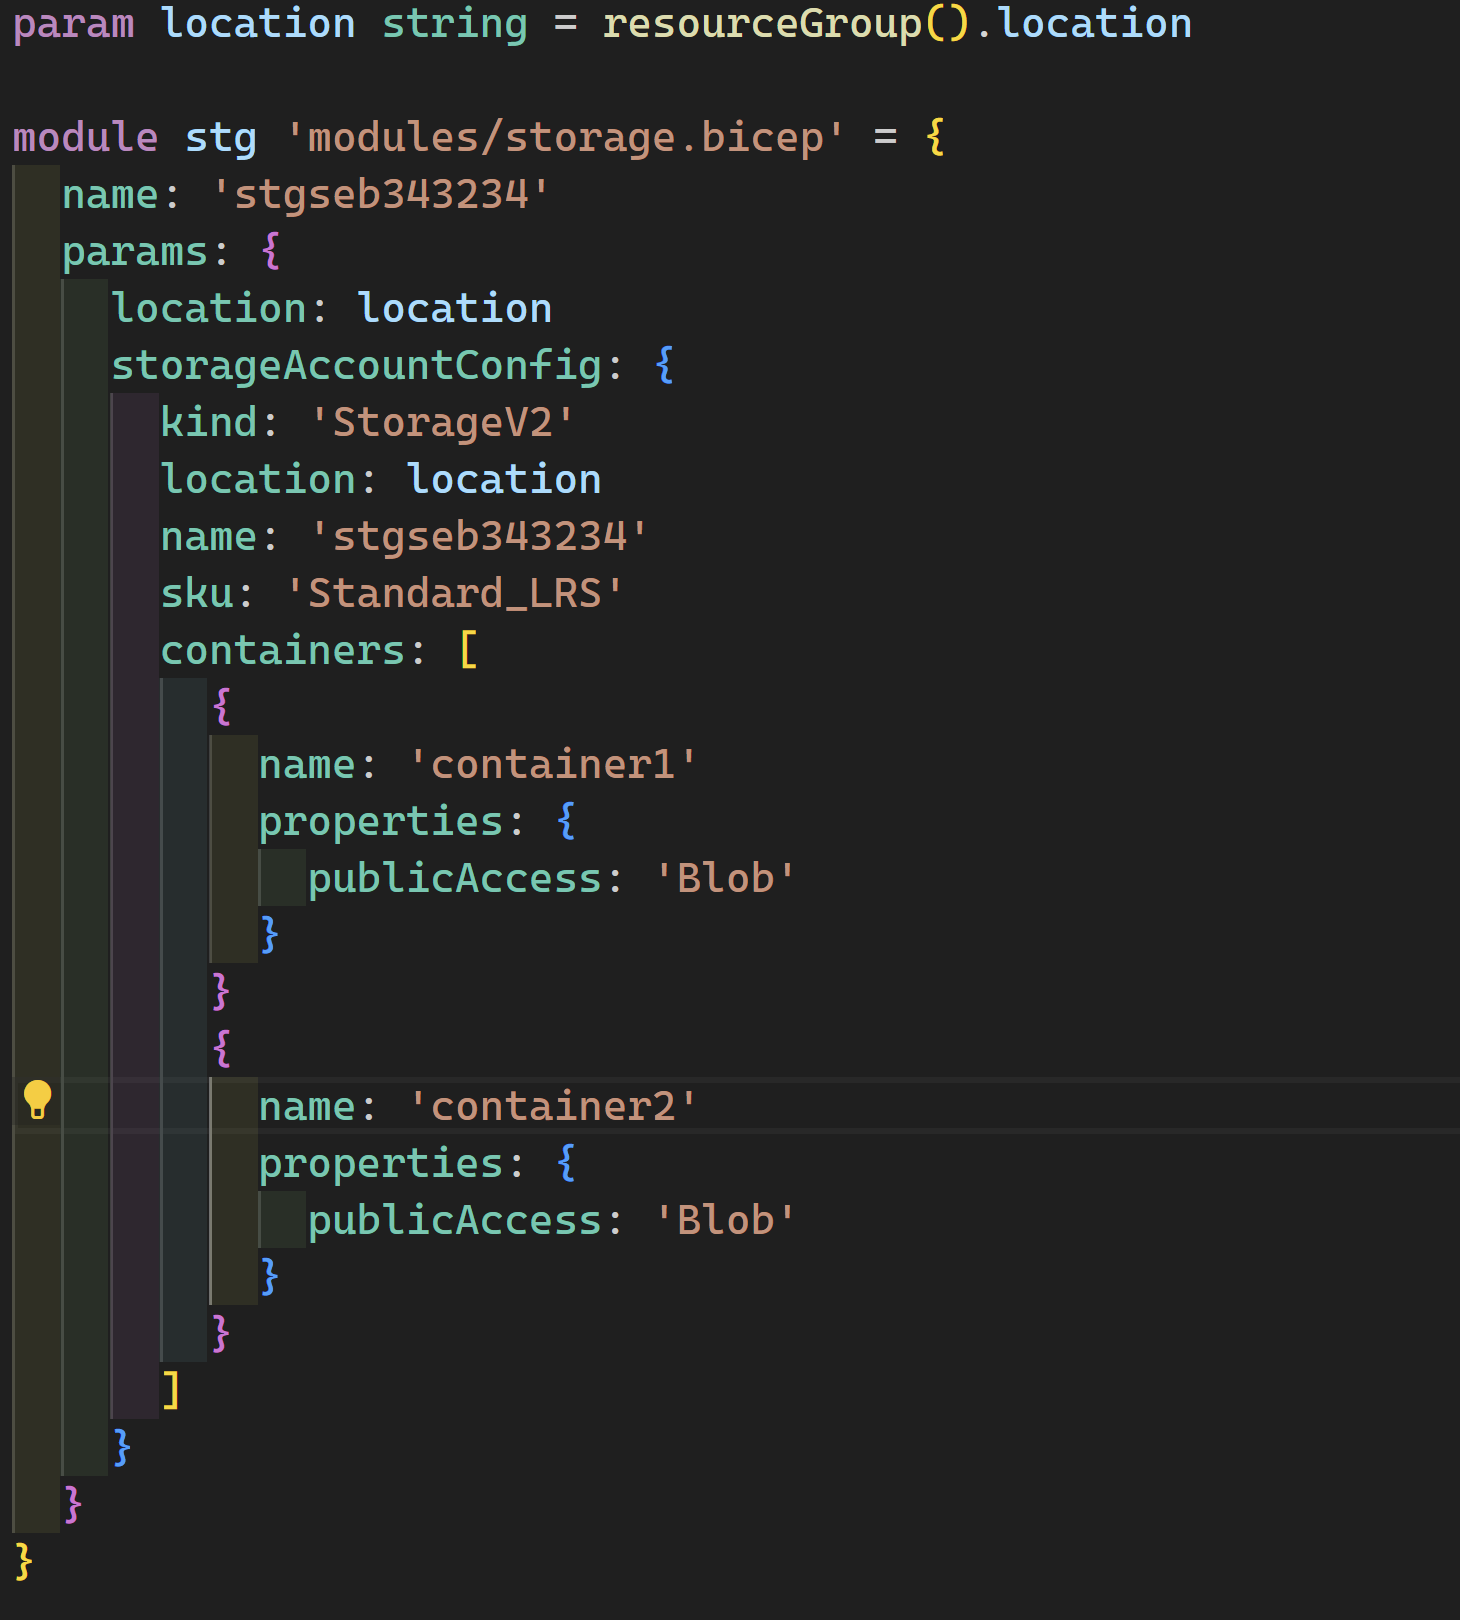
- Our complete module code should look like this:
param location string = resourceGroup().location
param storageAccountConfig storageAccountConfigType

type storageAccountSkuType = 'Standard_LRS' | 'Standard_GRS'

type containerConfigType = {
  name: string
  properties: {
    publicAccess: 'None' | 'Blob' | 'Container'
  }
}

type storageAccountConfigType = {
  name: string
  sku: storageAccountSkuType
  location: string
  kind: string
  @description('List of containers to create in the storage account')
  containers: containerConfigType[]?
}


resource storageAccount 'Microsoft.Storage/storageAccounts@2022-09-01' = {
  name: storageAccountConfig.name
  location: location
  sku: {
    name: storageAccountConfig.sku
  }
  kind: 'StorageV2'
}

resource blobService 'Microsoft.Storage/storageAccounts/blobServices@2023-01-01' = {
  name: 'default'
  parent: storageAccount
}

resource container 'Microsoft.Storage/storageAccounts/blobServices/containers@2023-01-01' = [for container in storageAccountConfig.containers: if(!empty(storageAccountConfig.containers)) {
  name: container.name
  parent: blobService
  properties: container.properties
}]
Consuming the Storage account module
Let’s explore the experience of consuming this module from main.bicep.
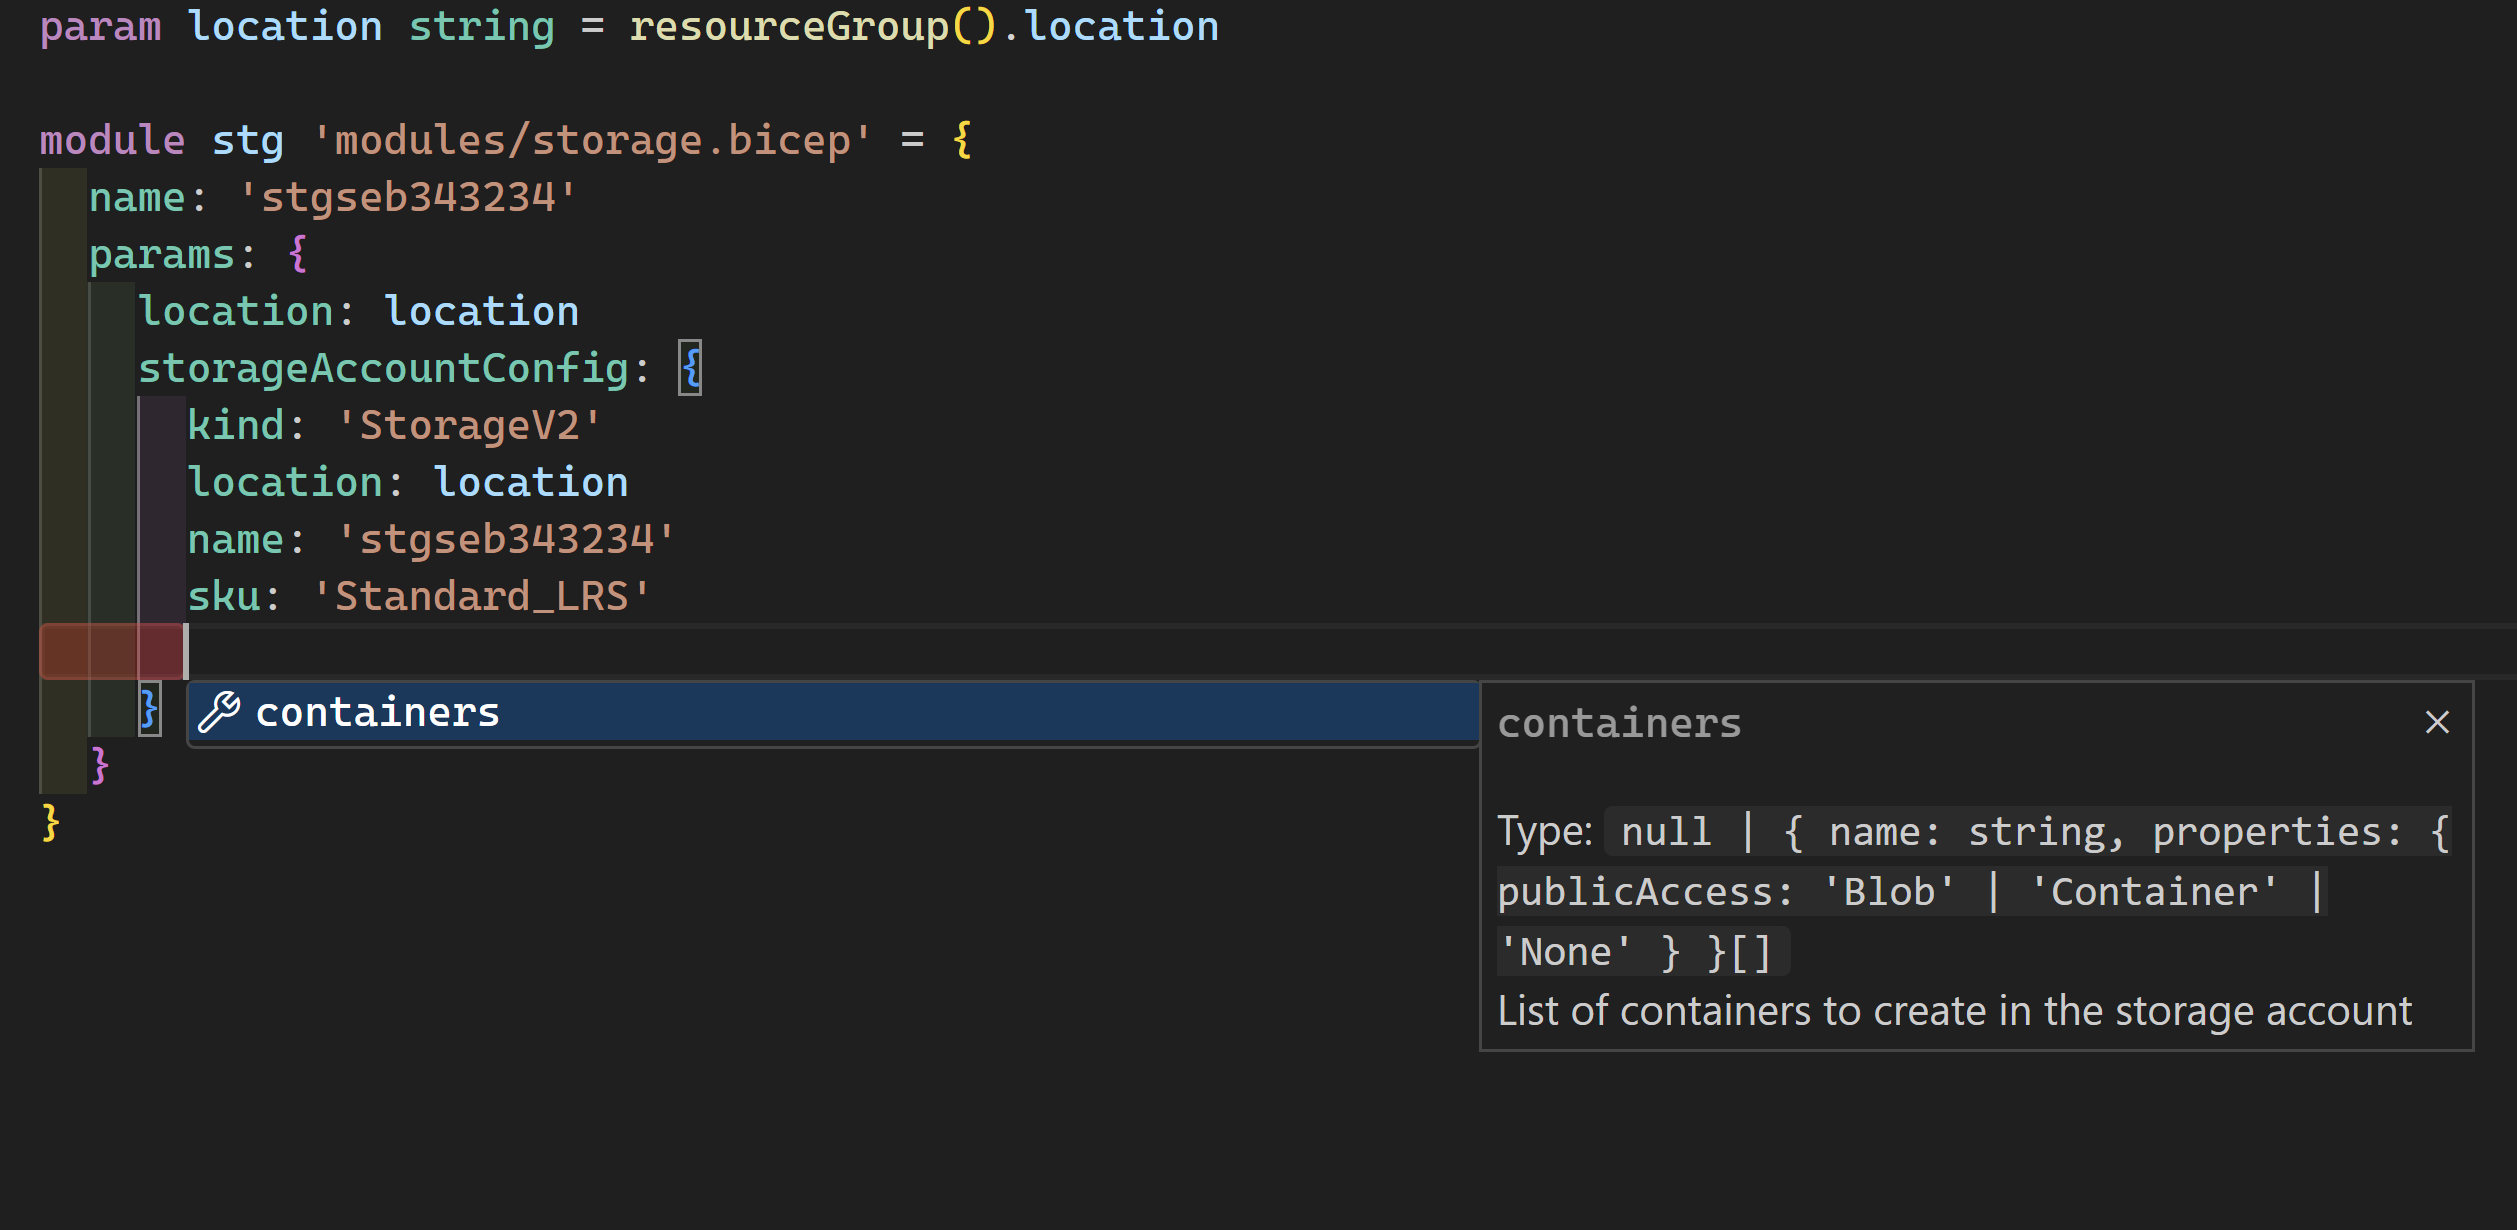
- When we start referencing the module and prompting for parameters, we can see that storageAccountConfig which is a parameter of type storageAccountConfigType appears.
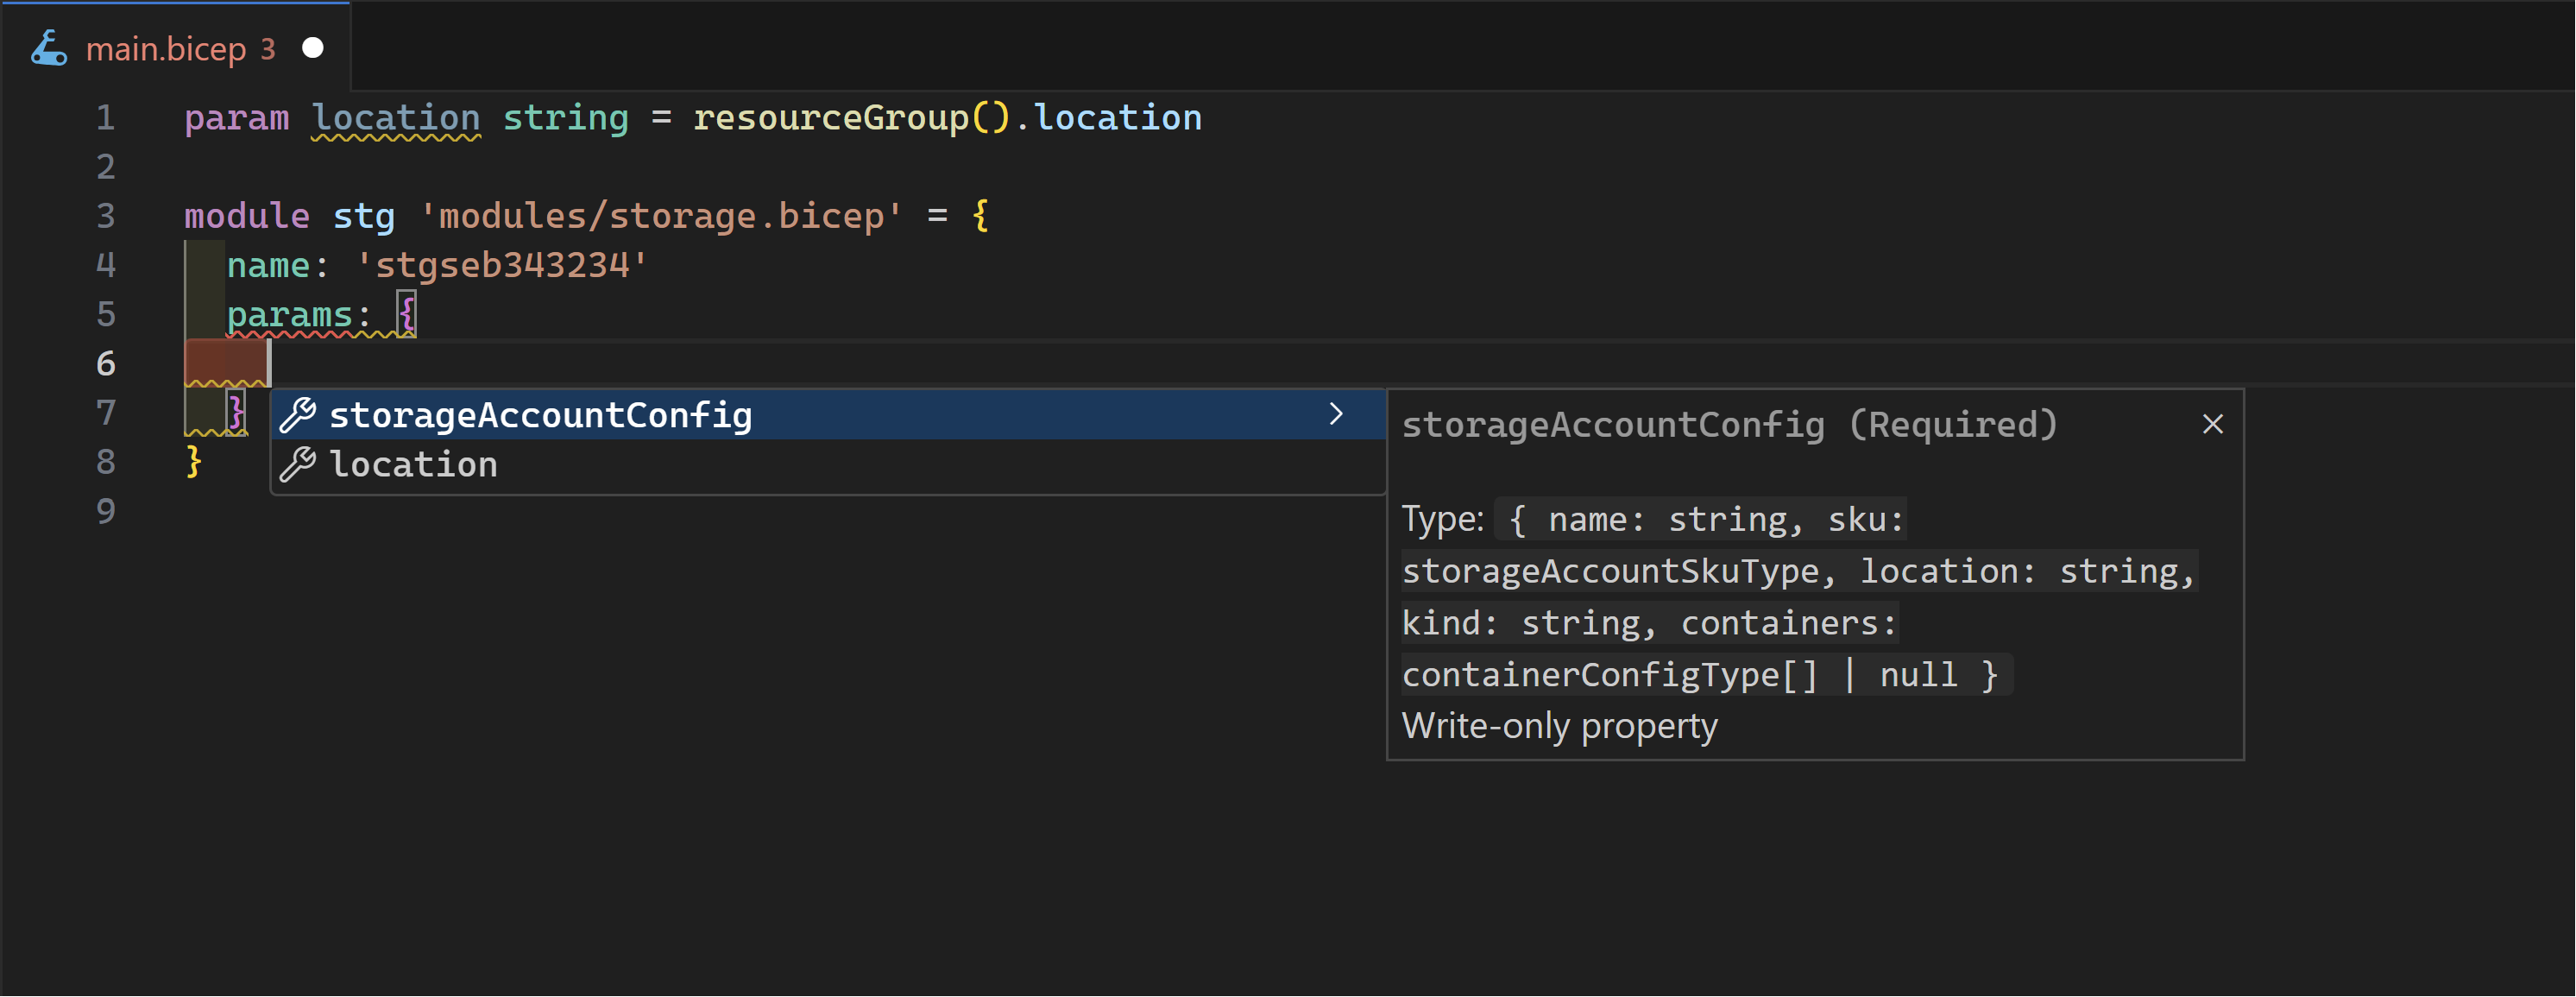
- The storageAccountConfig parameter prompts for all of the properties we defined in the custom type.
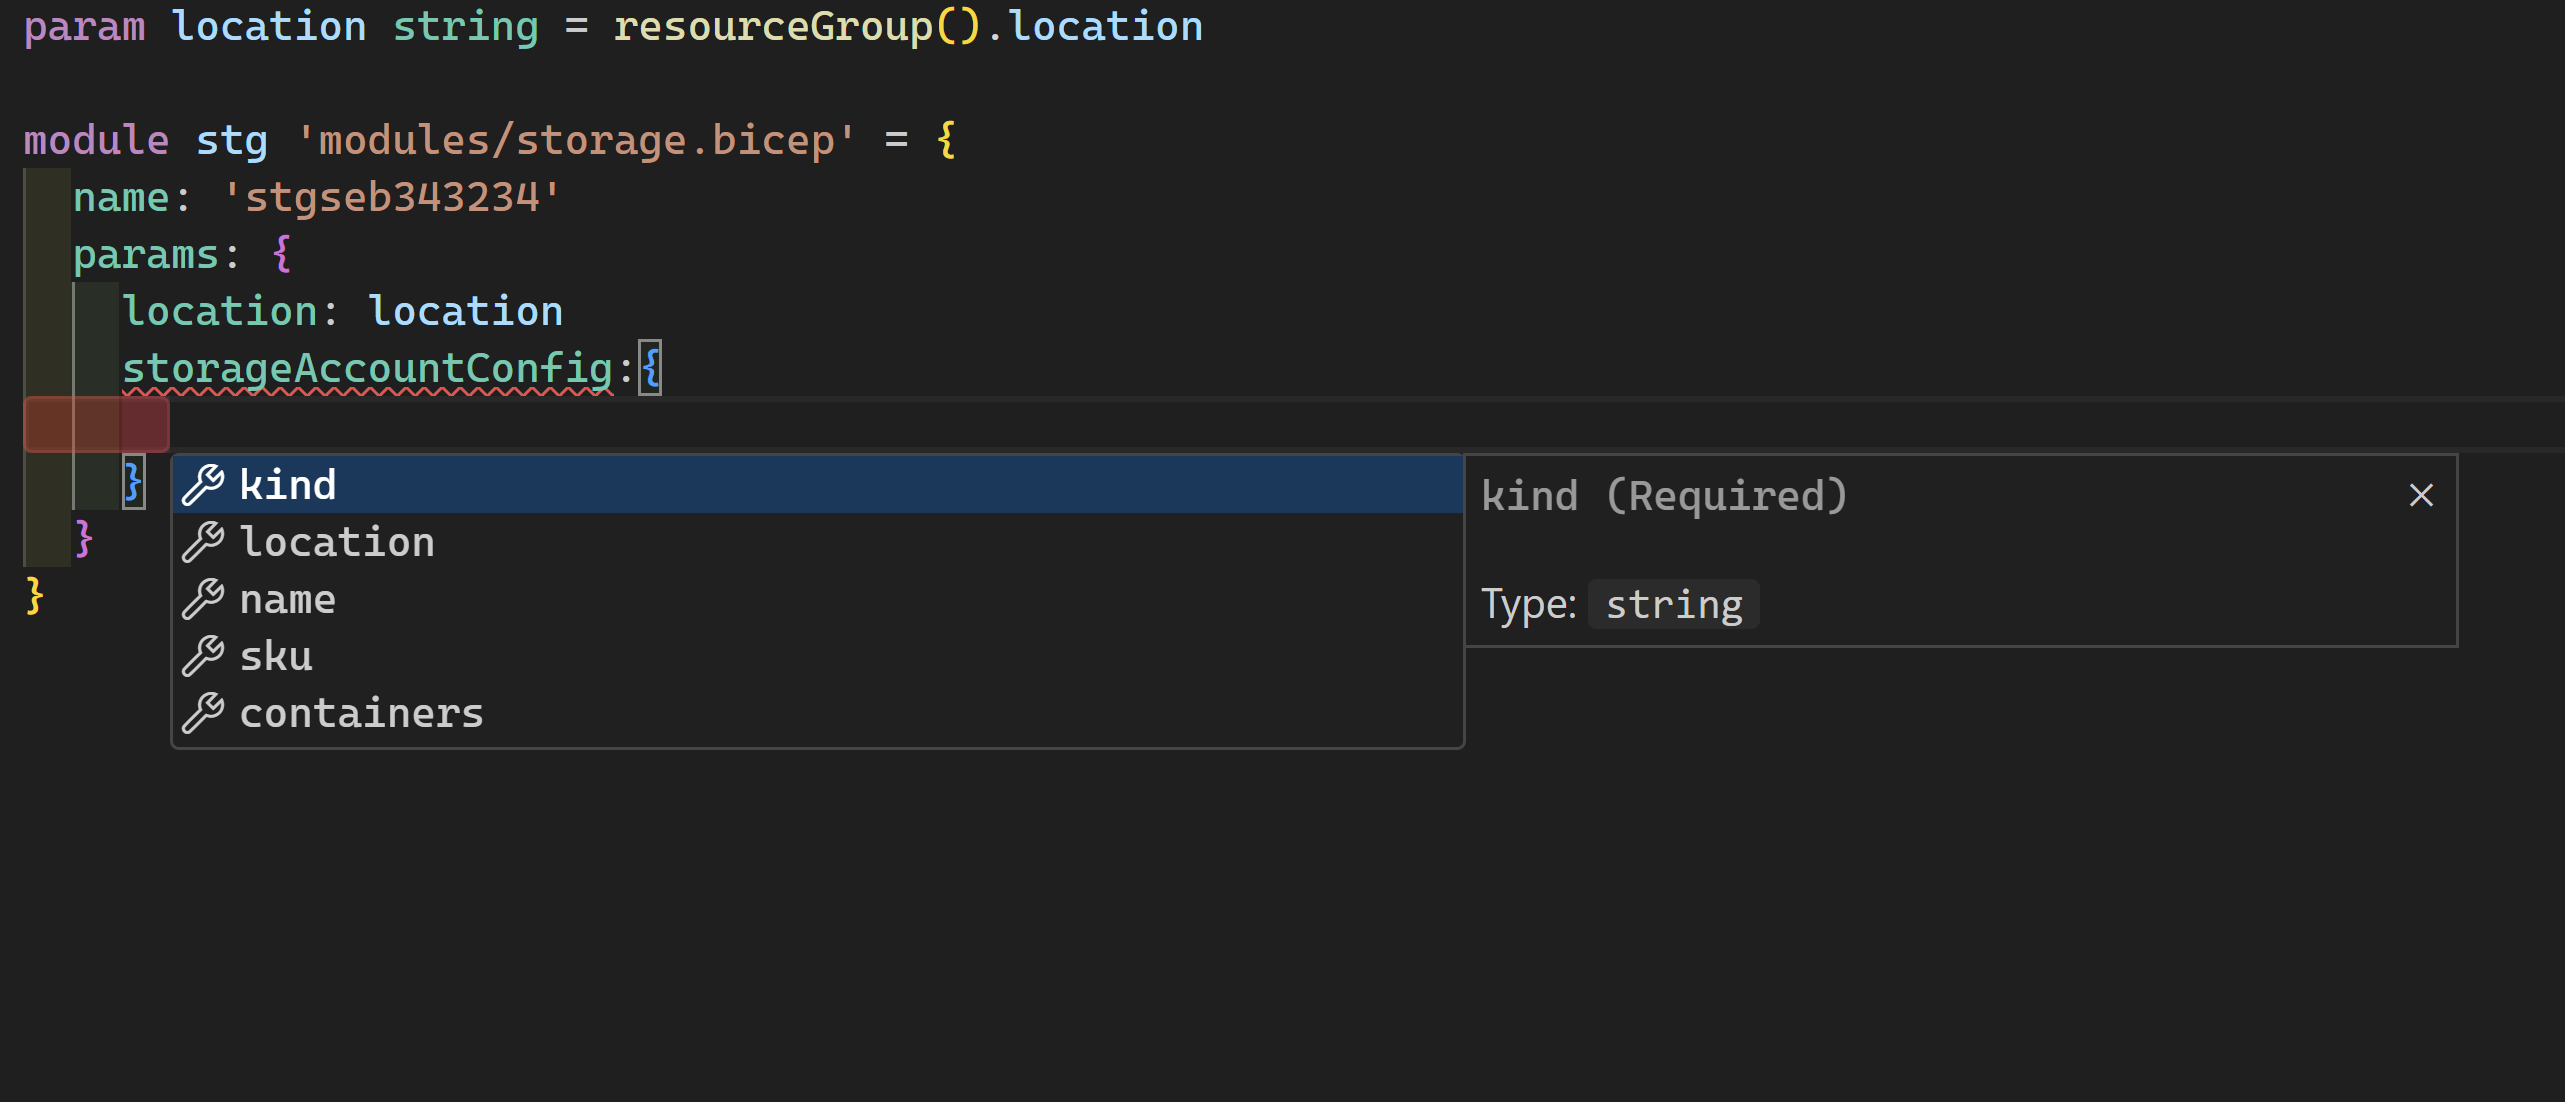
- We can see as well the values that are allowed for our defined types. In this example, the SKU type.
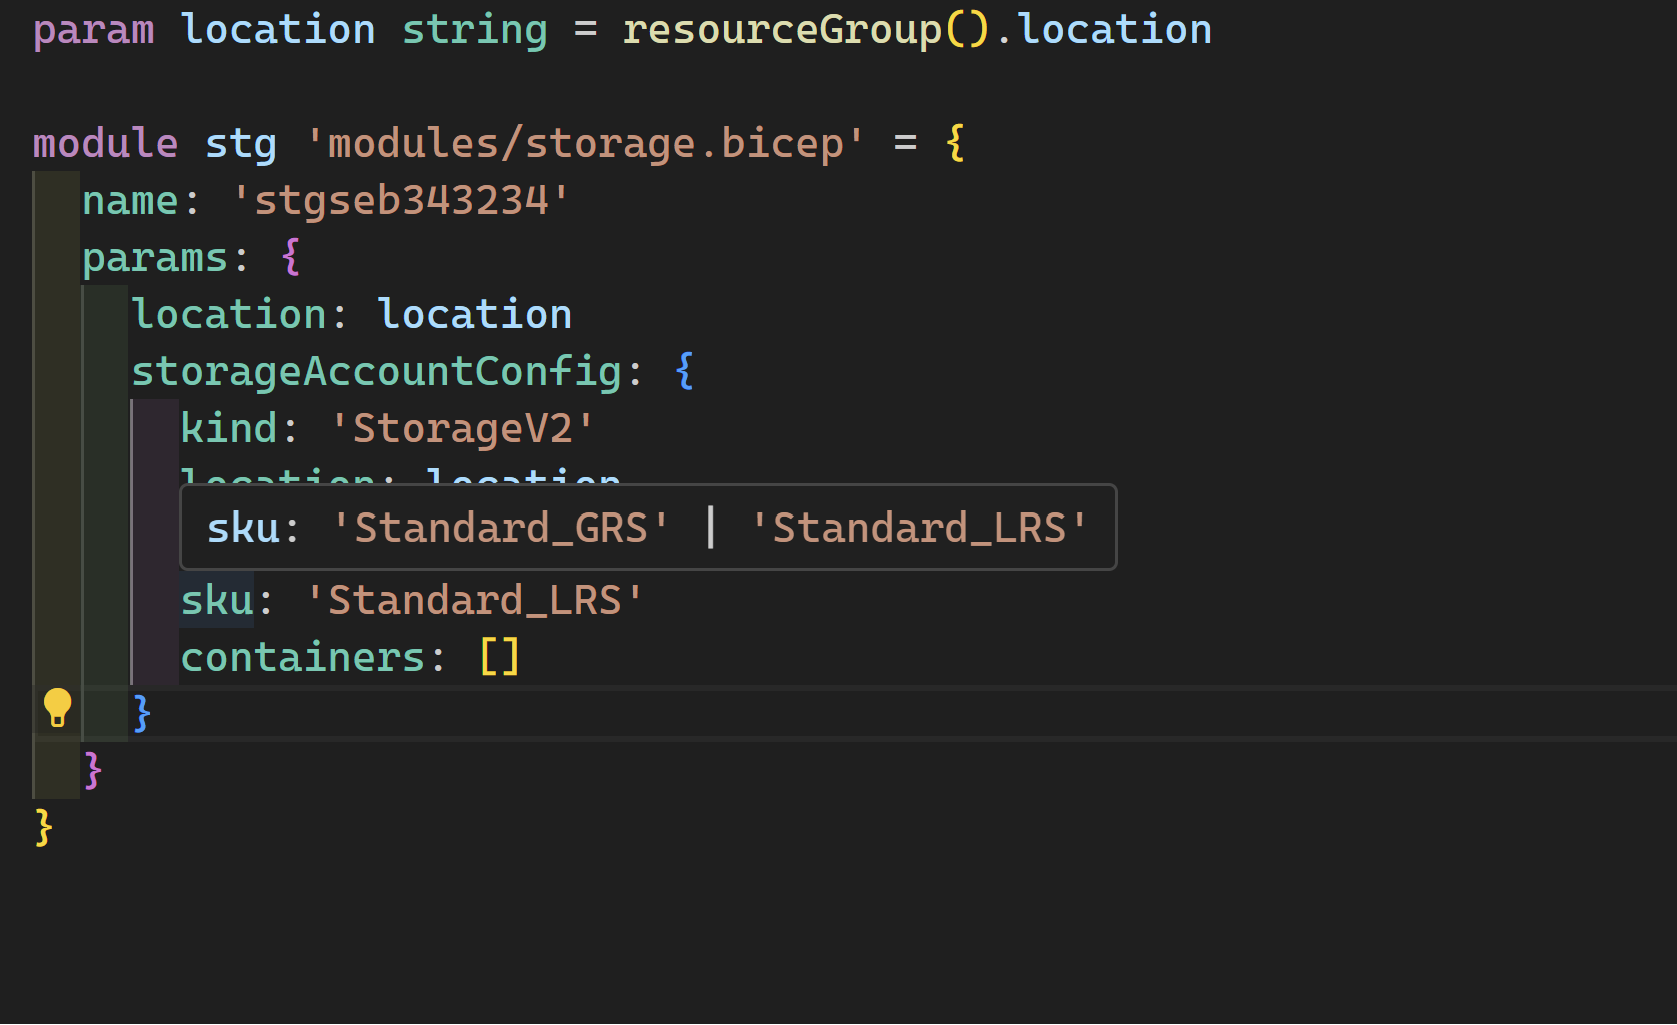
- Its easy to read and understand what values are need by the module, for example looking at the containers property, we can see the properties we need to provide through the description. Since we defined it as optional, we can just use an empty array [] to not create any containers.
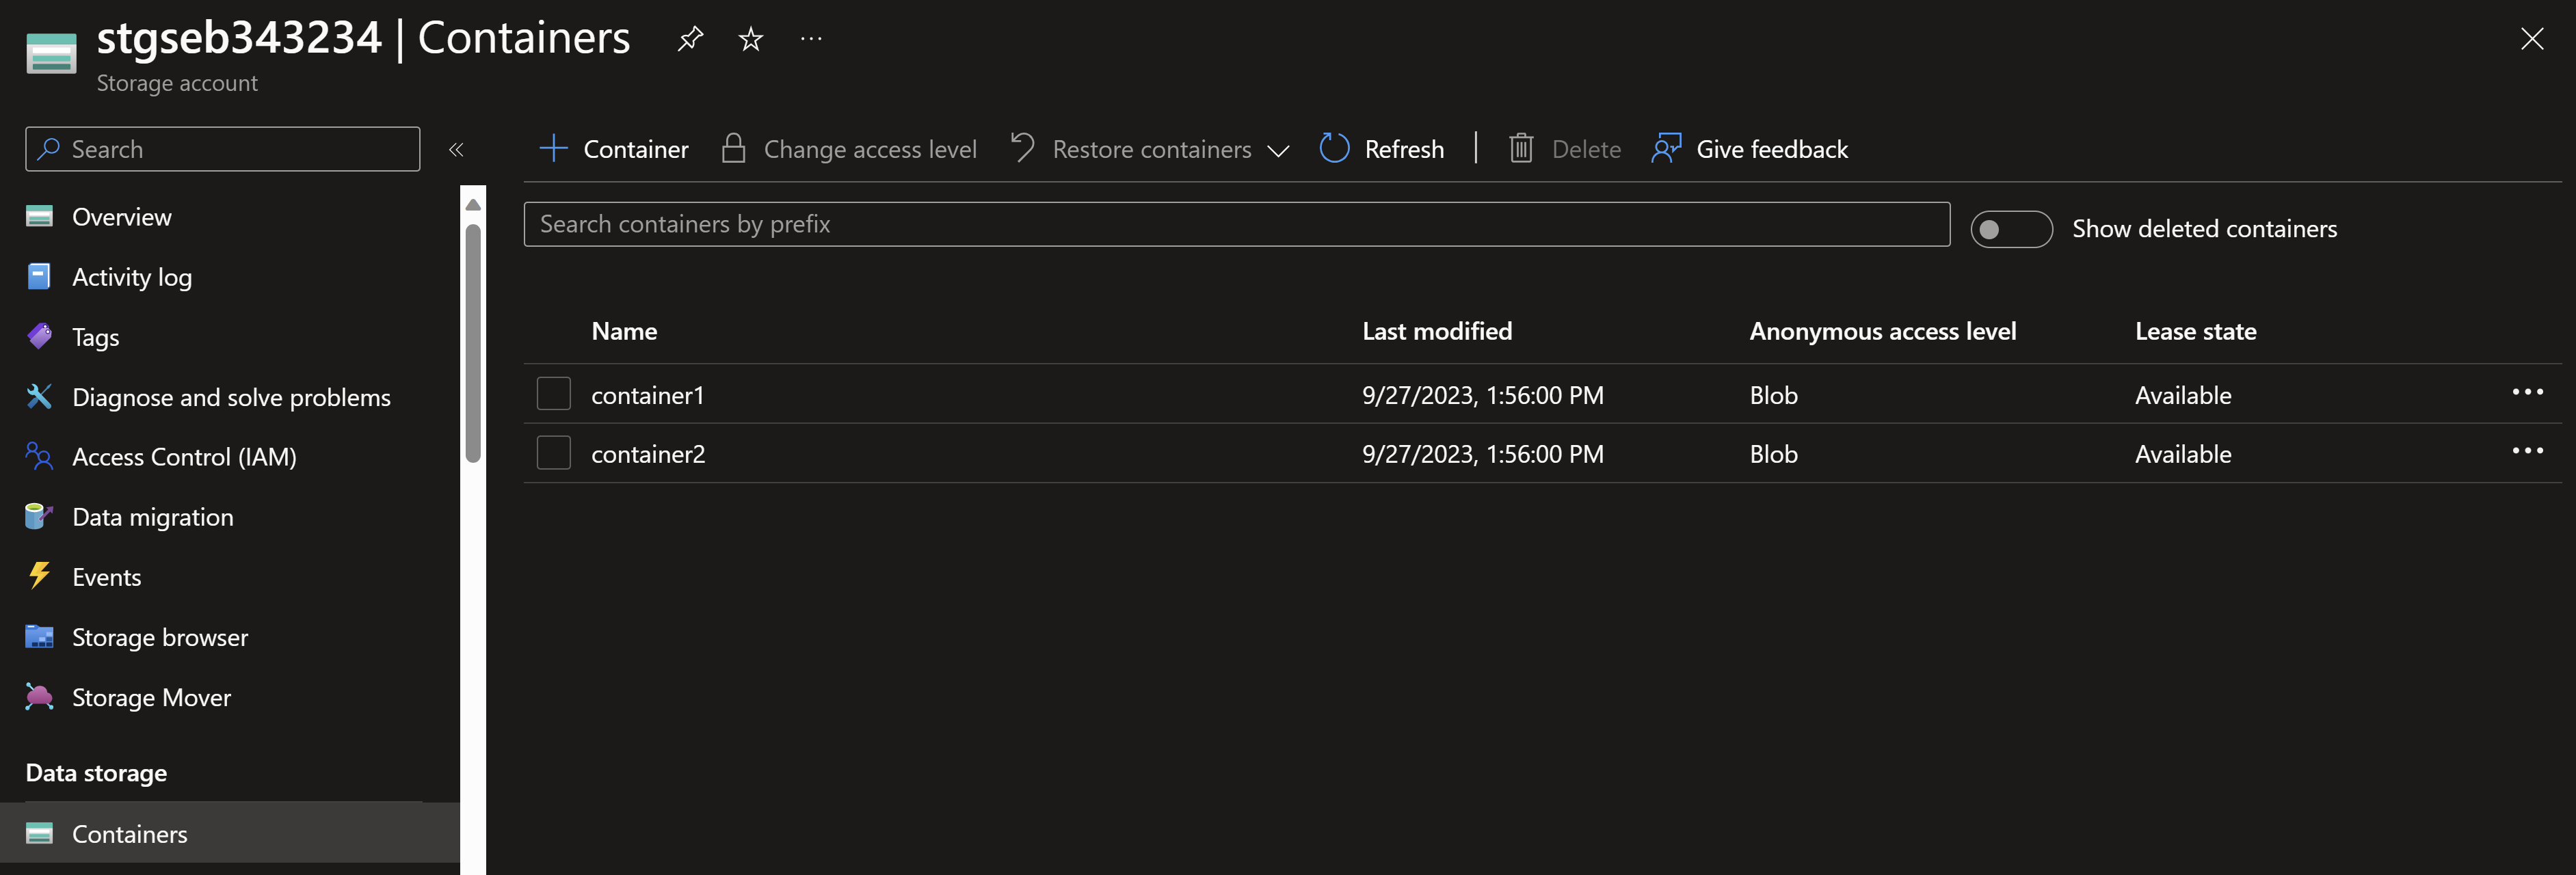
- By deploying this module, we can see we get a storage account with the two containers created.

My name is
Seif Bassem
You May Also Like
Re-usable Bicep modules using Azure Container Registry
Build re-usable Bicep modules Bicep enables you to organize your …

Continuous delivery to Azure using Bicep and GitHub actions
Infrastructure-as-code with Bicep and GitHub actions Bicep has been a …

Tips - Bicep conditional modules
I was recently developing some Bicep modules and hit a very strange …